请选择 进入手机版 | 继续访问电脑版
查看: 3736|回复: 5

[i.MX6ULL竞赛专区] 【我的项目666:智能家居之siri控制RGB彩灯-总帖】

[复制链接]
  • TA的每日心情
    奋斗
    2018-10-30 11:11
  • 签到天数: 49 天

    [LV.5]常住居民I

    1

    主题

    57

    帖子

    3

    注册会员

    Rank: 2

    积分
    188
    最后登录
    2019-7-17
    发表于 2018-6-6 15:13:35 | 显示全部楼层 |阅读模式
    本帖最后由 jcdeng1 于 2018-7-5 08:18 编辑

    一、系统
    1、收到板子,先晒图
    IMG_0056.JPG

    2、编译环境搭建:
    因为之前使用的就是ubuntu16.04的虚拟机,所以直接安装交叉编译器,下载交叉编译工具包,解压缩,然后添加环境变量即可:
    R$SD5I(@~M8]AR]W4U2{%)K.png
    一开始我是用的是最新的debian系统,但因为不能直接支持官方的网卡驱动,又没有太多时间去深入捣鼓,于是下载官方提供的内核,然后编译一下,代替之前的内核,系统启动前还需要两个步骤:
    a、配置无线,否则不能使用ssh连接:
    在PC端linux中挂载带有板子系统的sd卡,编辑/etc/wpa_supplicant.conf文件

    network={
    ssid="ssid"
    psk="password"
    proto=RSN
    key_mgmt=WPA-PSK
    pairwise=CCMP TKIP
    group=CCMP TKIP

    }

    保存,并在/etc/rc.local 文件中加入(exit 0之前):
    wpa_supplicant -Dwext -B -iwlan0 -c/etc/wpa_supplicant.conf

    这样,板子就可以在上电后自动连接wifi了
    b、配置ssh解决“ssh algorithm negotiation failed”的问题:

    安装SD卡到开发板,先用串口线连接,系统启动后,验证是否已分配了IP且已连上网,如果分配了IP不能上网,修改下DNS配置,正常上网后安装ssh,并在/etc/rc.local文件中添加开机启动,再修改一个文件,在/etc/ssh/sshd_config文件中追加

    Ciphers aes128-cbc,aes192-cbc,aes256-cbc,aes128-ctr,aes192-ctr,aes256-ctr,3des-cbc,arcfour128,arcfour256,arcfour,blowfish-cbc,cast128-cbc

    MACs hmac-md5,hmac-sha1,umac-64@openssh.com,hmac-ripemd160,hmac-sha1-96,hmac-md5-96

    KexAlgorithms diffie-hellman-group1-sha1,diffie-hellman-group14-sha1,diffie-hellman-group-exchange-sha1,diffie-hellman-group-exchange-sha256,ecdh-sha2-nistp256,ecdh-sha2-nistp384,ecdh-sha2-nistp521,diffie-hellman-group1-sha1,curve25519-sha256@libssh.org

    重启ssh就可以通过xshell连接了。


    系统启动完,用ssh工具连接登陆,查询系统版本:
    ]S~XDJY%2F$I)G$}Q$(H068.png

    二、中枢环境
    安装homeassistant、homebridge和mqtt
    安装需要python3.5.3以上环境,可以用源码编译安装最新版的。
    安装pip
    sudo pip3 install -U pip
    安装python虚拟环境
    sudo pip3 install virtualenv

    添加用户:
    sudo useradd -rm homeassistant
    sudo mkdir /srv/homeassistant
    sudo chown homeassistant:homeassistant /srv/homeassistant

    切换用户
    sudo su -s /bin/bash homeassistant

    创建虚拟运行环境并进入
    virtualenv -p python3 /srv/homeassistant
    source ./homeassistant/bin/activate

    安装依赖

    pip3 install netdisco

    安装homeassistant
    pip3 install -U homeassistant

    如果安装中出现“the ssl module in Python is not available”错误,则需要安装libssl-dev和openssl依赖包,并重新编译安装python3(3.5.3以上)。配置编译时添加 --with-ssl参数。

    安装homebridge:

    安装curl
    sudo apt-get install -y curl

    添加安装源
    curl -sL http://deb.nodesource.com/setup_7.x | sudo -E bash -
    ( 如果安装速度慢可以改成国内源
    sudo nano /etc/apt/sources.list.d/nodesource.list
    添加
    deb http://mirrors.tuna.tsinghua.edu.cn/nodesource/deb_7.x xenial main
    deb-src http://mirrors.tuna.tsinghua.edu.cn/nodesource/deb_7.x xenial main )

    安装nodejs
    sudo apt-get update
    sudo apt-get install -y nodejs

    安装homebridge
    sudo npm install -g --unsafe-perm homebridge

    安装插件
    sudo npm install -g homebridge-homeassistant


    添加homebridge用户
    sudo useradd -rm homebridge
    sudo mkdir /var/opt/homebridge
    sudo cp -R ~/.homebridge/* /var/opt/homebridge
    sudo chown -R homebridge:homebridge /var/opt/homebridge


    安装mqtt
    sudo apt-get install -y mosquitto mosquitto-clients
    (测试运行:开两个终端
    订阅主题:mosquitto_sub -h localhost -t hello/world -u username -P password
    发布主题:mosquitto_pub -h localhost -t hello/world -m "HELLO" -u username -P password

    配置文件 /etc/mosquitto/mosquitto.conf
    allow_anonymous允许匿名
    password_file密码文件
    acl_file访问控制列表
    添加用户和密码
    sudo chown mosquitto:mosquitto mosquitto.conf
    sudo touch pwfile
    sudo mosquitto_passwd -b pwfile "username" "password"
    sudo chown mosquitto:mosquitto pwfile
    sudo chmod u+rw pwfile
    启动
    sudo /etc/init.d/mosquitto start


    配置文件:

    修改/home/homeassistant/.homeassistant/configuration.yaml

    添加

    mqtt:
      broker: xxx.xxx.xxx.xxx
      port: 1883
      username: username
      password: password


    修改/var/opt/homebridge/config.json

    {
    "bridge": {
    "name": "Homebridge",
    "username": "xx:xx:xx:xx:xx:xx",
    "port": 51826,
    "pin": "123-45-678"
    },
    "platforms": [
    {
    "platform": "HomeAssistant",
    "name": "HomeAssistant",
    "host": "http://xxx.xxx.xxx.xxx:8123",
    "password": "",
    "supported_types": ["automation", "binary_sensor", "climate", "cover", "device_tracker", "fan", "group", "input_boolean", "light", "lock", "media_player", "remote", "scene", "sensor", "switch"],
    "default_visibility": "visible"
    }
    ]
    }


    需要增加两个脚本去启动homeassistant和homebridge,即切换到对应用户环境下,然后启动服务即可。

    启动两个服务后,使用iphone的home app扫描homebridge生成的二维码,在周围设备中也可以看到,直接添加:
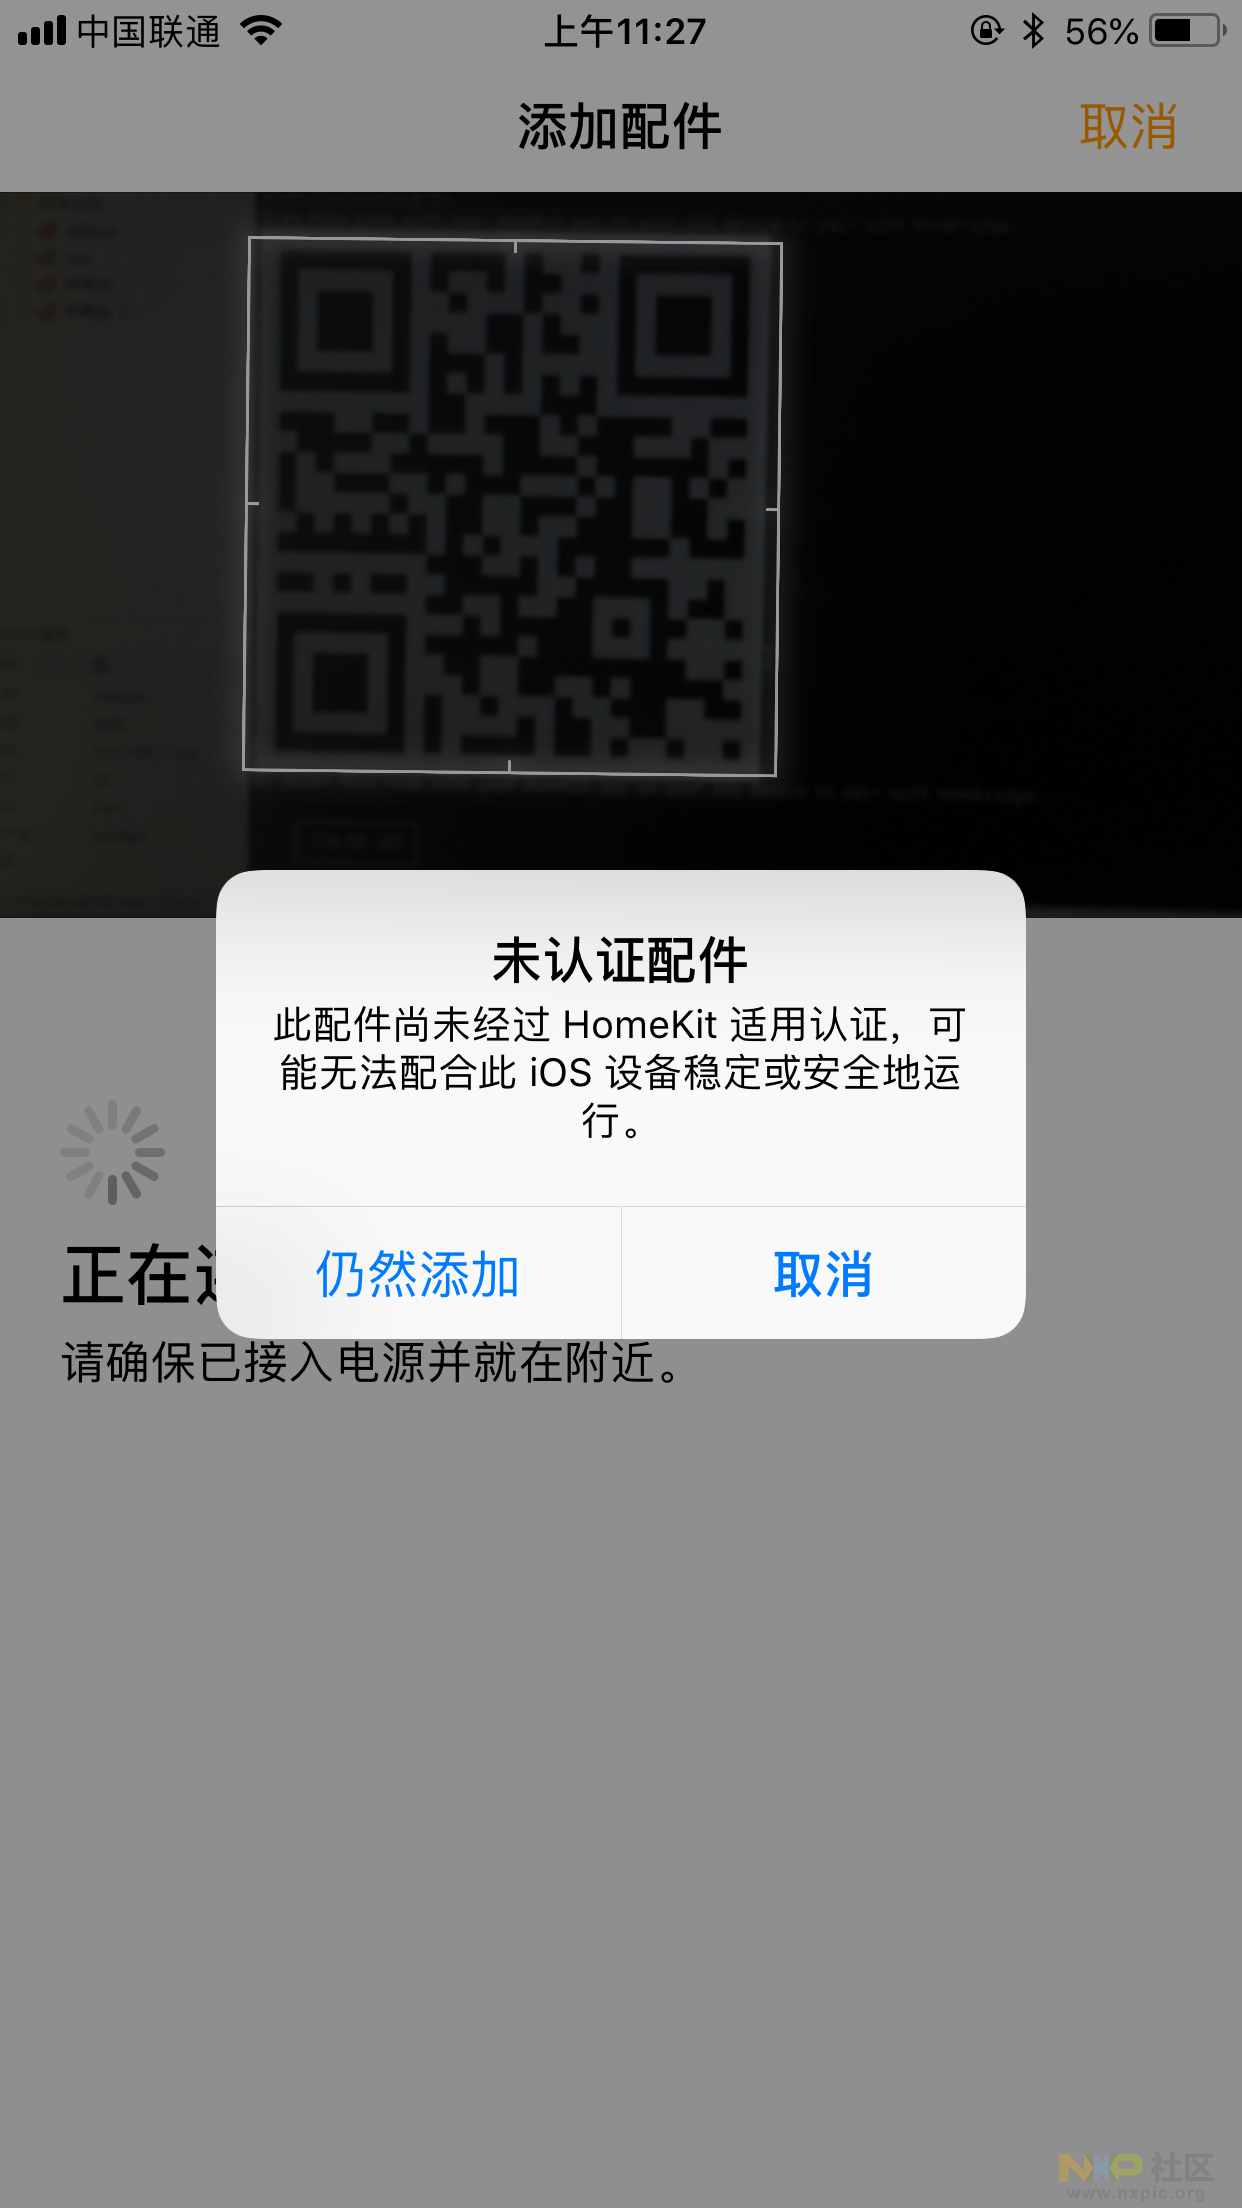


    IMG_0045.PNG
    至此软件环境搭好了。
    三、硬件环境
    1、首先,需要在homeassistant的配置文件中添加:
    light:
      platform: mqtt
      name: 'Light'
      state_topic: 'bedroom/rgb1/light/status'
      command_topic: 'bedroom/rgb1/light/switch'
      brightness_state_topic: 'bedroom/rgb1/brightness/status'
      brightness_command_topic: 'bedroom/rgb1/brightness/set'
      rgb_state_topic: 'bedroom/rgb1/rgb/status'
      rgb_command_topic: 'bedroom/rgb1/rgb/set'
      brightness_scale: 100
    重启hass便可以看到概览界面多了一个灯,这里可以在同一局域网下的电脑在浏览器中访问设备ip:8123端口号访问
    VM~MNM_MKIDMF3O7ED}2XOG.png
    2、硬件电路设计:
    主控器使用esp12-f模块,电路中加入RGB调色灯和可控硅控制以及过零检测,本帖只涉及RGB控制。
    O3J58AKE@44IUW}1RVUE}$R.png
    IMG_0235.JPG

    3、硬件程序设计:

    1、配置mqtt_config.h中MQTT_HOST、MQTT_PORT、MQTT_CLIENT_ID、MQTT_USER、MQTT_PASS、STA_SSID、STA_PASS的值,以匹配以上搭建的mqtt环境
    2、添加RGB设备
    struct RGB_param{
         uint32   R;
         uint32   G;
         uint32   B;
    };

    struct light_state {
        uint32  state;
        uint32  brightness;
    };

    struct light_param {
        uint32  pwm_period;
        uint32  pwm_duty[PWM_CHANNEL];
        struct light_state state_t;
        struct RGB_param   rgb_t;
    };
    3、设计控制逻辑。。
    代码太啰嗦,直接说下原理,其实很简单,就是订阅mqtt服务端的消息,当接收到“bedroom/rgb1/rgb/set”topic的消息后,得到RGB的值,转换设置到对应io的pwm中即可,亮度直接同比例增大R、G、B的值。

    写完代码,调试上电
    IMG_0231.JPG
    重新打开home app,设置颜色
    IMG_0236.PNG

    查看效果:
    IMG_0237.JPG
    IMG_0239.JPG

    最后:感谢村长提醒,homeassistant已可以直接支持ios,不过时间原因,没再捣鼓,本帖到此结束,如有不妥之处,请各位大佬不吝赐教

    评分

    参与人数 1 +3 收起 理由
    doatello + 3

    查看全部评分

    该会员没有填写今日想说内容.
    回复

    使用道具 举报

  • TA的每日心情

    2016-10-20 09:45
  • 签到天数: 1 天

    [LV.1]初来乍到

    80

    主题

    1038

    帖子

    5

    版主

    Rank: 7Rank: 7Rank: 7

    积分
    2223
    最后登录
    2023-11-20
    发表于 2018-6-6 16:09:06 | 显示全部楼层
    hass 最新的支持直接homkit了
    回复 支持 反对

    使用道具 举报

  • TA的每日心情
    奋斗
    2018-10-30 11:11
  • 签到天数: 49 天

    [LV.5]常住居民I

    1

    主题

    57

    帖子

    3

    注册会员

    Rank: 2

    积分
    188
    最后登录
    2019-7-17
     楼主| 发表于 2018-6-6 16:30:11 | 显示全部楼层
    花溪村长 发表于 2018-6-6 16:09
    hass 最新的支持直接homkit了

    是我落后啦等下去瞅瞅
    该会员没有填写今日想说内容.
    回复 支持 反对

    使用道具 举报

  • TA的每日心情
    慵懒
    2018-10-17 09:43
  • 签到天数: 47 天

    [LV.5]常住居民I

    21

    主题

    135

    帖子

    0

    中级会员

    Rank: 3Rank: 3

    积分
    487
    最后登录
    2022-10-24
    发表于 2018-6-15 14:55:44 | 显示全部楼层
    坐等你的进度分享
    该会员没有填写今日想说内容.
    回复 支持 反对

    使用道具 举报

  • TA的每日心情
    奋斗
    2018-10-30 11:11
  • 签到天数: 49 天

    [LV.5]常住居民I

    1

    主题

    57

    帖子

    3

    注册会员

    Rank: 2

    积分
    188
    最后登录
    2019-7-17
     楼主| 发表于 2018-7-3 22:33:45 | 显示全部楼层
    swiftman 发表于 2018-6-15 14:55
    坐等你的进度分享

    小猪佩奇,大佬大佬
    该会员没有填写今日想说内容.
    回复 支持 反对

    使用道具 举报

  • TA的每日心情
    奋斗
    2018-10-30 11:11
  • 签到天数: 49 天

    [LV.5]常住居民I

    1

    主题

    57

    帖子

    3

    注册会员

    Rank: 2

    积分
    188
    最后登录
    2019-7-17
     楼主| 发表于 2018-7-16 19:23:55 | 显示全部楼层
    自己给自己顶一下
    该会员没有填写今日想说内容.
    回复 支持 反对

    使用道具 举报

    您需要登录后才可以回帖 注册/登录

    本版积分规则

    关闭

    站长推荐上一条 /4 下一条

    Archiver|手机版|小黑屋|恩智浦技术社区

    GMT+8, 2024-3-28 20:53 , Processed in 0.135321 second(s), 26 queries , MemCache On.

    Powered by Discuz! X3.4

    Copyright © 2001-2021, Tencent Cloud.

    快速回复 返回顶部 返回列表