在线时间4858 小时
UID3441752
注册时间2017-11-21
NXP金币72699
TA的每日心情 | 开心
2025-7-11 08:53 |
|---|
签到天数: 301 天 连续签到: 2 天 [LV.8]以坛为家I
管理员
  
- 积分
- 40915
- 最后登录
- 2025-10-27
|
一、背景
OTA是空中升级的缩写,OTAP是指实现OTA的应用。
在QN9080和KW35/36的OTAP,都是单独以工程otap_att_client或otac_att的形式存在,如果其他的的工程需要添加OTAP的功能,必须将otap_att_client/otac_att工程移植到其他的工程中。
随着QN9080和KW35/36的客户增多,在支持客户的过程中,发现很多客户移植过程中遇到很多问题或者一些客户不愿意花费过多时间做移植,所以决定写一篇应用文档讲述如何将otap_att_client/otac_att工程移植到其他的工程,节约客户的开发时间。
二、移植向导
由于篇幅有限,本文只讲述移植的实操细节,不涉及OTAP的原理讲述,有关OTAP的功能具体细节请参考:BLE Application Developer's Guide.pdf的第11章节; OTAP的升级操作步骤参考:BLE Demo Applications User's Guide.pdf的第5.19章节。
本文提到的所有工程均来自相应的SDK开发包中,前述pdf文档也在SDK的docs目录下。
为方便起见,下文中QN908x SDK的private_profile_server_freertos工程将简写为QPPS工程,KW35/36 SDK中的w_uart工程将简写为Wuart工程。
本文以QPPS工程和Wuart工程为基础,两者都是FreeRTOS版本,分别移植otap_att_client和otac_att的FreeRTOS版本的工程,且已按照该文档步骤在开发板上验证通过,文中如没有特别说明,则表示移植步骤都适用这两个工程,IDE为IAR 8.30.2。
全文分三部分讲述移植过程:
第一部分:讲述如何将otap_att_client/otac_att工程的核心代码,文件otap_att_client.c和otap_att_client.h的一部分,局部静态变量的相关代码,转化成可直接被其他所有工程能用的全局变量代码,并移除无用代码。QPPS中移植好的otap_att_client.c和otap_att_client.h,可直接供QN908x SDK中所有工程使用;Wuart中移植好的otap_att_client.c和otap_att_client.h,可供KW35/36 SDK中所有的工程使用;
第二部分:讲述如何在这两个工程中添加与OTAP相关的工程配置;
第三部分:讲述在这两个工程中的代码修改细节。
三、改造源文件和头文件
在QN908x的SDK中,将两个文件otap_client_att.c和otap_clien_att.h
从目录 :
..\wireless_examples\bluetooth\otap_client_att
拷贝到目录:
..\wireless_examples\bluetooth\private_profile_server
在KW35/36的SDK中,将两个文件otap_client_att.c和otap_clien_att.h
从目录:
..\boards\frdmkw36\wireless_examples\bluetooth\otac_att
拷贝到目录:
..\boards\frdmkw36\wireless_examples \bluetooth\w_uart
改造分为两部分:删除代码和修改代码。
3.1 删除代码
删除的这些代码大部分是与private_profile_server.c中的代码功能重叠,小部分是要被移植到private_profile_server.c中。
◆◆ 删除以下头文件:
- #include "RNG_Interface.h"
- #include "Keyboard.h"
- #include "LED.h"
- #include "battery_interface.h"
- #include "device_info_interface.h"
◆◆ 直接按照以下图片内容删除代码:


◆◆ 将otap_client_att.c中的以下函数的代码内容删除:
- void BleApp_Init(void)
- void BleApp_Start(void)
- void BleApp_HandleKeys(key_event_t events)
- void BleApp_GenericCallback (gapGenericEvent_t* pGenericEvent)
- static void BleApp_Config()
- static void BleApp_Advertise(void)
- static void BleApp_AdvertisingCallback (gapAdvertisingEvent_t* pAdvertisingEvent)
- static void BleApp_ConnectionCallback (deviceId_t peerDeviceId, gapConnectionEvent_t* pConnectionEvent)
- static void BleApp_GattServerCallback (deviceId_t deviceId, gattServerEvent_t* pServerEvent)
- static void BatteryMeasurementTimerCallback(void * pParam)
例如 void BleApp_Init(void),删除的部分如下图所示

◆◆ 将otap_client_att.c中的函数BleApp_AttributeWritten()中的以下几行代码去除

◆◆ 在otap_client_att.h中去除如下代码:

3.2 修改代码
◆◆ 将以下头文件从otap_client_att.c中移入otap_client_att.h中:

◆◆ 将下图的结构体从otap_client_att.c 移入otap_client_att.h中

◆◆ 将如下图的函数声明由otap_client_att.c移入otap_client_att.h,并去掉局部静态变量声明static,修改成如下图所示:

◆◆ 在otap_client_att.c中将以下的函数声明的局部静态变量static去除,变为全局变量:
- void BleApp_AttMtuChanged ()
- void BleApp_CccdWritten ()
- void BleApp_AttributeWritten()
- void BleApp_AttributeWrittenWithoutResponse()
- void BleApp_HandleValueConfirmation()
- void OtapClient_HandleConnectionEvent()
- void OtapClient_HandleDisconnectionEvent()
例如:void BleApp_AttMtuChanged ()

四、修改工程配置
◆◆ 如果是QN908x SDK, 需增加两个链接宏定义和一项编译宏定义:
链接宏定义添加如下两项:
gUseBootloaderLink_d=1
gUseIntemalStorageLink_d=1
编译宏定义添加如下一项:
gEepromType_d=1


◆◆ 如果是KW35/36 SDK,则设置如下两项链接宏定义:
- gUseBootloaderLink_d=1;
- gUseIntemalStorageLink_d=0;
◆◆ 添加Otap、otasupport和flash的相关头文件的编译路径:
QN908x SDK中设置如下:

KW35/36 SDK 中,设置如下:

◆◆ 增加flash关联代码到工程:
QN908x SDK中,从..\Flash\External中的Interface和Source文件中添加,source文件中只需添加Eeprom_InternalFlash.c:
附注:Flash的在SDK中的文件路径如下:
..\middleware\wireless\framework_5.6.4\Flash

如果是KW35/36 SDK ,从..\Flash\External中的Interface和Source文件中添加,source文件中只需添加:Eeprom_AT45DB041E.c
附注:Flash在SDK中的文件路径如下:
..\middleware\wireless\framework_5.4.4\Flash

◆◆ 添加OtaSupport framework相关代码至工程中:
QN908x SDK中,从OtaSupport中的Interface和Source中添加.
附注:OtaSupport 在SDK中的文件路径:
..\middleware\wireless\framework_5.6.4\OtaSupport
KW35/36 SDK中, 从OtaSupport中的Interface和Source文件添加.
附注:OtaSupport 在SDK中的文件路径:
..\middleware\wireless\framework_5.4.4\OtaSupport

◆◆ 在Bluetooth/profiles/下添加otap profile代码文件
QN908x SDK中,从otap中添加otap profile 相关代码文件.
附注:otap在SDK中的文件路径:
..\middleware\wireless\bluetooth_1.5.4\profiles\otap
KW35/36 SDK, 从otap中添加otap profile 相关代码文件。
附注:otap在SDK中的文件路径:
..\middleware\wireless\bluetooth_1.3.4\profiles\otap

◆◆ 在source中添加改造好的应用otap_client_att.c和otap_client_att.h,下图是以private_profile_server_freetros工程为例:

五、在工程中添加OTAP相关代码
5.1 app_preinclude.h中设置OTAP应用相关的宏:
QN908x SDK中,设置如下:
KW35/36 SDK中, 设置如下:
- #define gEepromType_d gEepromDevice_AT45DB041E_c
- #define gEepromParams_WriteAlignment_c 8
- #define gAppUseNvm_d 1
5.2 app_config.c中,添加OTAP对应广播数据包:
adData1的数组和adType的值,,必须更改成如下图所示,否则APP Iot Toolbox的OTAP子项中扫描的时候无法识别到该设备,因为Iot Toolbox以该UUID来识别该设备是否是OTAP设备。
如客户使用自己开发的APP进行OTA,略过此修改。
- const uint8_t adData1[] ={
- 0xE0, 0x1C, 0x4B, 0x5E, 0x1E, 0xEB, 0xA1, 0x5C,
- 0xEE, 0xF4, 0x5E, 0xBA, 0x50, 0x55, 0xFF, 0X01};

5.3 Gatt_db.h中添加otap相关的database,从otap_client_att工程的gatt_db.h中拷贝:

5.4 Gatt_uuid128.h中添加OTAP characristics的UUID,从otap_client_att工程中的gatt_uuid128.h中拷贝:

5.5 private_profile_server.c和wireless_uart.c中添加和修改代码。
以下截图以private_profile_server.c中为例,如没有特别说明,wireless_uart.c中的添加方式与private_profile_server.c一样。
添加头文件:

◆◆ 添加函数声明:
- 1. extern void OtapClient_HandleConnectionEvent(deviceId_t deviceId);
- 2. extern void OtapClient_HandleDisconnectionEvent (deviceId_t deviceId);
- 3. extern void BleApp_AttMtuChanged (deviceId_t deviceId, uint16_t negotiatedMtu);
- 4. extern void BleApp_CccdWritten (deviceId_t deviceId, uint16_t handle, gattCccdFlags_t cccd);
- 5. extern void BleApp_AttributeWritten (deviceId_t deviceId, uint16_t handle, uint16_t length, uint8_t* pValue);
- 6. extern void BleApp_AttributeWrittenWithoutResponse (deviceId_t deviceId, uint16_t handle, uint16_t length, uint8_t* pValue);
- 7. extern void BleApp_HandleValueConfirmation (deviceId_t deviceId);

◆◆ 添加OTAP相关的配置信息代码:
QN908x SDK中,private_profile_server.c中添加:
- static otapClientConfig_t otapServiceConfig = {service_otap};
- static uint16_t cpHandles[] = {value_qpps_rx, value_otap_control_point,value_otap_data};

KW35/36 SDK中,wireless_uart.c中添加:
- static otapClientConfig_t otapServiceConfig = {service_otap};
- static uint16_t mCharMonitoredHandles[] = { value_uart_stream, value_otap_control_point, value_otap_data };

static void BleApp_Config()中添加如下:
OtapCS_Start(&otapServiceConfig);

BleApp_ConnectionCallback()的case gConnEvtConnected_c:下添加如下两行:
OtapCS_Subscribe(peerDeviceId);
OtapClient_HandleConnectionEvent(peerDeviceId);

case gConnEvtDisconnected_c: 中添加如下两行:
OtapCS_Unsubscribe();
OtapClient_HandleDisconnectionEvent (peerDeviceId);

◆◆ 在BleApp_GattServerCallback()添加OTAP数据处理的代码,具体的细节如下:
如果该应用代码已经包含了gEvtMtuChanged_c, 则直接在该分支之下加调用函数:
BleApp_AttMtuChanged (deviceId, pServerEvent->eventData.mtuChangedEvent.newMtu);

case gEvtAttributeWritten_c中添加代码如下,在其他的工程中,如果没有该分支,则将以下代码拷贝全部添加,反之,只需添加方框内的代码。
- 1. case gEvtAttributeWritten_c:
- 2. {
- 3. handle = pServerEvent->eventData.attributeWrittenEvent.handle;
- 4. status = gAttErrCodeNoError_c;
- 5. GattServer_SendAttributeWrittenStatus(deviceId, handle, status);
- 6. if (handle == value_otap_control_point)
- 7. {
- 8. BleApp_AttributeWritten (deviceId,
- 9. pServerEvent->eventData.attributeWrittenEvent.handle,
- 10. pServerEvent->eventData.attributeWrittenEvent.cValueLength,
- 11. pServerEvent->eventData.attributeWrittenEvent.aValue);
- 12. }
- 13. }
- 14. break;

Case gEvtAttributeWrittenWithoutResponse_c下添加,在其他的工程中,如果没有该分支,则将以下代码拷贝全部添加,反之,只需添加方框内的代码。
- 1. case gEvtAttributeWrittenWithoutResponse_c:
- 2. {
- 3. handle = pServerEvent->eventData.attributeWrittenEvent.handle;
- 4. if (handle == value_otap_data)
- 5. {
- 6. BleApp_AttributeWrittenWithoutResponse (deviceId,
- 7. pServerEvent->eventData.attributeWrittenEvent.handle,
- 8. pServerEvent->eventData.attributeWrittenEvent.cValueLength,
- 9. pServerEvent->eventData.attributeWrittenEvent.aValue);
- 10. }
- 11. }
- 12. break;

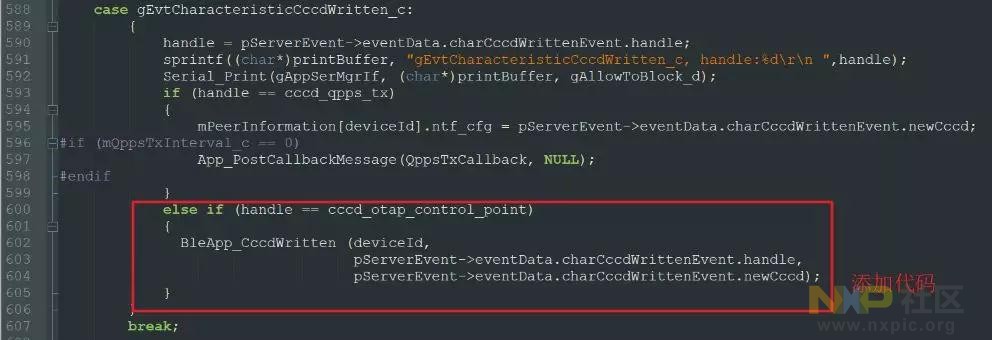
Case gEvtCharacteristicCccdWritten_c下添加,在其他的工程中,如果没有该分支,则将以下代码拷贝全部添加,反之,只需添加方框内的代码。
- 1. case gEvtCharacteristicCccdWritten_c:
- 2. {
- 3. handle = pServerEvent->eventData.charCccdWrittenEvent.handle;
- 4. if (handle == cccd_otap_control_point)
- 5. {
- 6. BleApp_CccdWritten (deviceId,
- 7. pServerEvent->eventData.charCccdWrittenEvent.handle,
- 8. pServerEvent->eventData.charCccdWrittenEvent.newCccd);
- 9. }
- 10. }
- 11. break;

Case gEvtHandleValueConfirmation_c下,在其他的工程中,如果没有该分支,则将以下代码拷贝全部添加,反之,只需添加方框内的代码。
- 1.case gEvtHandleValueConfirmation_c:
- 2.BleApp_HandleValueConfirmation (deviceId);
- 3.break;

在上述的代码添加中,如果出现handle, status 变量未定义的,则在函数BleApp_GattServerCallback()中添加以下临时变量定义:
uint16_t handle;
uint8_t status;
至此,相关的代码都添加完毕。
六、验证
工程编译OK ,参照文档BLE Demo Applications User's Guide.pdf的第5.19章节进行验证OTAP功能是否添加成功:

文章出处:恩智浦MCU加油站
|
|
 /3
/3 