查看: 1620|回复: 2

[LPC双核挑战赛] ADC问题

[复制链接]
  • TA的每日心情
    擦汗
    2023-12-19 16:25
  • 签到天数: 14 天

    [LV.3]偶尔看看II

    10

    主题

    63

    帖子

    25

    中级会员

    Rank: 3Rank: 3

    积分
    367
    最后登录
    2023-12-19
    发表于 2018-6-2 11:55:27 | 显示全部楼层 |阅读模式
    初始化了两路ADC,自己用电位器测试了可以使用,电压在0--4096之间变化,但是接上传感器之后输出一直咂3700左右变化。

    使用示波器直接测试传感器的输出也是正确的,有变化,但是接上单片机之后再测试就发现测试结果不对了,就稳定在了3700左右。

    请问这是什么问题,下面贴上我的代码:
    uint8_t adc_init(void)
    {       
            uint8_t ret = 0;

           
            adc_config_t adcConfigStruct;
            adc_conv_seq_config_t adcConvSeqConfigStruct;
           
           
    // Configure the power and clock for ADC.
      POWER_DisablePD(kPDRUNCFG_PD_ADC0);     /* Power on the ADC converter. */
      POWER_DisablePD(kPDRUNCFG_PD_VD7_ENA);  /* Power on the analog power supply. */
      POWER_DisablePD(kPDRUNCFG_PD_VREFP_SW); /* Power on the reference voltage source. */
      POWER_DisablePD(kPDRUNCFG_PD_TEMPS);    /* Power on the temperature sensor. */

    // Enable the clock.
    //  CLOCK_AttachClk(kFRO12M_to_MAIN_CLK);
      CLOCK_EnableClock(kCLOCK_Adc0); /* SYSCON->AHBCLKCTRL[0] |= SYSCON_AHBCLKCTRL_ADC0_MASK; */
           
    //        IOCON_PinMuxSet(IOCON, 1, 0, IOCON_MODE_INACT | IOCON_FUNC0 | IOCON_ANALOG_EN | IOCON_INPFILT_OFF);
           
    // Calibration
            if (ADC_DoSelfCalibration(ADC0))
            {
                    ;
            }
            else
            {
                    return 0;
            }

            /* Configure the converter. */
            adcConfigStruct.clockMode = kADC_ClockSynchronousMode; /* Using sync clock source. */
            adcConfigStruct.clockDividerNumber = 1;                /* The divider for sync clock is 2. */
            adcConfigStruct.resolution = kADC_Resolution12bit;
            adcConfigStruct.enableBypassCalibration = false;
            adcConfigStruct.sampleTimeNumber = 0U;
            ADC_Init(ADC0, &adcConfigStruct);

            /* Use the sensor input to channel 0. */
            ADC_EnableTemperatureSensor(ADC0, true);

            /* Enable channel 0's conversion in Sequence A. */
            adcConvSeqConfigStruct.channelMask = (1U << ADC_CHANNEL4_NUM | 1U << ADC_CHANNEL5_NUM); /* Includes channel 0. */
            adcConvSeqConfigStruct.triggerMask = 0U;
            adcConvSeqConfigStruct.triggerPolarity = kADC_TriggerPolarityNegativeEdge;
            adcConvSeqConfigStruct.enableSingleStep = false;
            adcConvSeqConfigStruct.enableSyncBypass = false;
            adcConvSeqConfigStruct.interruptMode = kADC_InterruptForEachSequence;
            ADC_SetConvSeqAConfig(ADC0, &adcConvSeqConfigStruct);
            ADC_EnableConvSeqA(ADC0, true); /* Enable the conversion sequence A. */
           
    //        /* Enable channel 0's conversion in Sequence A. */
    //        adcConvSeqConfigStruct.channelMask = (1U << ADC_CHANNEL5_NUM); /* Includes channel 0. */
    //        adcConvSeqConfigStruct.triggerMask = 0U;
    //        adcConvSeqConfigStruct.triggerPolarity = kADC_TriggerPolarityNegativeEdge;
    //        adcConvSeqConfigStruct.enableSingleStep = false;
    //        adcConvSeqConfigStruct.enableSyncBypass = false;
    //        adcConvSeqConfigStruct.interruptMode = kADC_InterruptForEachSequence;
    //        ADC_SetConvSeqAConfig(ADC0, &adcConvSeqConfigStruct);
    //        ADC_EnableConvSeqA(ADC0, true); /* Enable the conversion sequence A. */
           
            ret = 1;
            return ret;
    }


    uint16_t adc_read(uint16_t num)
    {

            ADC_DoSoftwareTriggerConvSeqA(ADC0);
            /* Wait for the converter to be done. */
            while (!ADC_GetChannelConversionResult(ADC0, num, &gAdcResultInfoStruct))
            {
            }       
           
            return (gAdcResultInfoStruct.result&0x0FFF);
    }


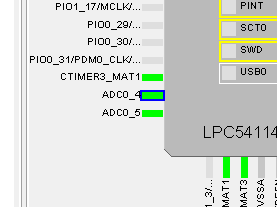
    引脚也是初始化了的。使用MCUXpresso Config Tools v4.0初始化的
    1.png
    该会员没有填写今日想说内容.
    回复

    使用道具 举报

  • TA的每日心情
    擦汗
    2023-12-19 16:25
  • 签到天数: 14 天

    [LV.3]偶尔看看II

    10

    主题

    63

    帖子

    25

    中级会员

    Rank: 3Rank: 3

    积分
    367
    最后登录
    2023-12-19
     楼主| 发表于 2018-6-2 14:55:07 | 显示全部楼层
    我加了一个电位器之后,通过电位器输出再与传感器连接之后,总算有了数值变化,变化的幅度有1000多了,我也不清楚造成最原始ad值读取不出来的原因是什么?期望有人能解答?
    该会员没有填写今日想说内容.
    回复 支持 反对

    使用道具 举报

  • TA的每日心情
    开心
    2019-3-22 20:15
  • 签到天数: 21 天

    [LV.4]偶尔看看III

    23

    主题

    341

    帖子

    1

    高级会员

    Rank: 4

    积分
    909
    最后登录
    2019-4-7
    发表于 2018-6-5 07:36:28 | 显示全部楼层
    IOCON初始化模式0
    可以参考我的寄存器
    1. #define ADC_RESOL_BIT        12        //12位ADC转换
    2. void ADC_Init(void)//ADC初始化
    3. {
    4.         uint32 i=0;
    5.         uint32_t ctrl;
    6.         uint32_t tmp;
    7. //1.配置管脚功能(ADC管脚采用 模拟 )
    8.         PORT0_IOCON29 = 0x01;//adc0
    9. //        PORT1_IOCON1 = 0x01;//adc4
    10. //        PORT1_IOCON2 = 0x01;//adc5
    11. //        PORT1_IOCON3 = 0x01;//adc6
    12.        
    13.        
    14. //2.ADC配置
    15.         Chip_SYSCON_PowerUp(SYSCON_PDRUNCFG_PD_ADC0 | SYSCON_PDRUNCFG_PD_VDDA_ENA | SYSCON_PDRUNCFG_PD_VREFP);//启动ADC模块供电电源
    16.         Chip_Clock_EnablePeriphClock(SYSCON_CLOCK_ADC0);//开启ADC0时钟
    17.         Chip_SYSCON_PeriphReset(RESET_ADC0);//复位ADC0
    18.         SYSCON_BASE_PTR->ADCCLKSEL = (uint32_t) 0x00;
    19.         SYSCON_BASE_PTR->ADCCLKDIV = 0x1;       
    20.         ADC_SEQA_CTRL = 0x00;
    21.         ADC_SEQB_CTRL = 0x00;
    22.         //配置ADC管脚:需要修改这个!!!
    23.         ADC_SEQA_CTRL = (0x1<<0)|0xa0000000;        // 信道11:0 |0xa0000000  启动信道0
    24.        
    25. //ADC分辨率设置://3-12 2-10 1-8 0-6
    26. #if ADC_RESOL_BIT == 12
    27.         ADC_CTRL = ((0x3)<<9)|0xFF;
    28. #elif ADC_RESOL_BIT == 10
    29.         ADC_CTRL = ((0x2)<<9)|0xFF;
    30. #elif ADC_RESOL_BIT == 8
    31.         ADC_CTRL = ((0x1)<<9)|0xFF;
    32. #else
    33.         ADC_CTRL = ((0x0)<<9)|0xFF;
    34. #endif       
    35.         ADC_STARTUP = 0x1;
    36.         for ( i = 0; i < 0x10; i++ ) {}       
    37. //校准
    38.         //1,设置ADC频率为30MHz       
    39.         ctrl = ADC_CTRL & 0x00007fff;
    40.         tmp = ctrl;
    41.         tmp &= ~(1 << 8);               
    42.         ADC_CTRL = tmp | 0x63;
    43.         //2,启动校准       
    44.         ADC_CALIBR = 0x01;
    45.         i = 0xF0000;
    46.         while ( (ADC_CALIBR & 0x01) && --i );
    47.         //3,设置频率为原频率       
    48.         ADC_CTRL = ctrl;
    49. //启动ADC               
    50.         ADC_STARTUP = 0x3;
    51.                
    52. /*读取ADCn数据
    53.                 ADC_SEQA_CTRL|=0x1<<26;
    54.                 var[1] = (ADC_DAT3>>4)&0xFFF;
    55.                 var[2] = (ADC_DAT4>>4)&0xFFF;
    56. */               
    57. }
    复制代码

    评分

    参与人数 1 +1 收起 理由
    doatello + 1

    查看全部评分

    成功的小小喜悦里,大脑自身可以产生兴奋剂哦!
    回复 支持 反对

    使用道具 举报

    您需要登录后才可以回帖 注册/登录

    本版积分规则

    关闭

    站长推荐上一条 /4 下一条

    Archiver|手机版|小黑屋|恩智浦技术社区

    GMT+8, 2024-4-26 06:57 , Processed in 0.121119 second(s), 22 queries , MemCache On.

    Powered by Discuz! X3.4

    Copyright © 2001-2024, Tencent Cloud.

    快速回复 返回顶部 返回列表